Tuesday, February 9, 2016

THE SEQUENCE OF CARDIOPULMONARY RESUSCITATION (CPR)


THE SEQUENCE OF CARDIOPULMONARY RESUSCITATION (CPR)

When a casualty has no pulse and is not breathing, you must combine artificial ventilation with chest compression.. This is the sequence known as CPR. You must, if alone, call for help before you star CPR. With a helper – ideally, a second. First Aider – the situation become easier. In every case, you must persevere with resuscitation attempts until either a pulse returns, professional help arrives and takes over, or physical exhaustion forces you to stop.

FOR ONE FIRST AIDER

1. Immediately dial 999 for an ambulance. 
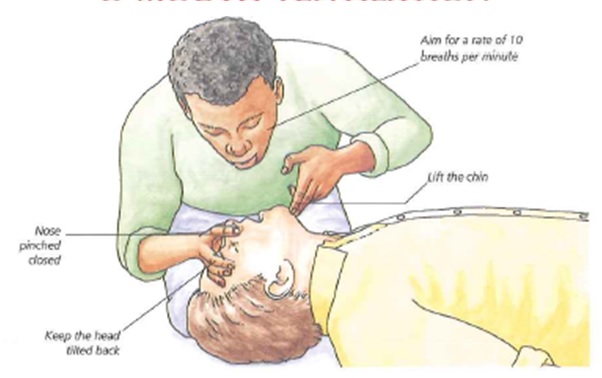
 2. Open the casualty’s airway by tilting the head and lifting the chin, and give two breaths of artificial ventilation. 
 3. Move your hands to the casualty’s chest, and give 15 chest compressions. 
4. Return to the head and give two more ventilation.
5. Give 15 further compressions.
6. Continue to give two ventilations every 15 compressions until professional help arrives. It is very unlikely that you will be rewarded by the heart re-starting before expert assistance is given. Do not interrupt CPR to make pulse checks unless there is any sign of a retuning circulation. With a pulse confirmed, check breathing and, if it is still absent, continue with artificial ventilation. Please check the pulse after every 10 breaths, and be prepared to re-start chest compressions if it disappears. If the casualty start to breathe unaided, place him or her in the recovery position. Re-check breathing and pulse every three minutes.


FOR TWO FIRST AIDERS


One person should go to summon help while the other immediately starts CPR. Then, either puoceed as above, each person taking it in turn, or while one of you gives chest compressions, the other can give one breath of artificial ventilation after every five compressions. Pause to ensure that the casualty’s chest rises, but do not wait for the chest to fall before continuing with chest compression.


MAKING A DIAGNOSIS


Once, it’s safe to start giving treatment, you must first identify what is wrong with the casualty. The process by which you recognise what is wrong is called diagnosis; this will often involve suspicion rather than certainty. Your diagnosis will be a conclusion, probability, on which you should be prepared to act. Making a diagnosis often requires a thorough physical examination. Factors that will help you include history and clues to any medical condition, and symptoms and signs. Throughout this chapter, the probable history, symptoms and signs of specific illnesses and injuries are grouped under the heading Recognition.

EXTERNAL CLUES


1. Pointers to diabetes An insulin syringe (which may look like a pen) and/or sugar lumps tell you that the casualty is a Diabetic.

2. Warning bracelet This example gives a telephone number for information about the casualty’s medical history.

3. Inhaler These ”puffer” aerosols are frequently carried by asthmatics and angina sufferers.

4. Medicines Glyceryl trinitrate is taken for angina, for example; phenobarbitone or phenytoin for epiletsy. Simpler remedies may give clues—indigestion tablets could indicate a stomach ulcer.


Resuscitation for Children


Resuscitation for Children

Fortunately, it is rare for a child’s heart to stop, but there are dangers in airway blockage and inadequate breathing. Artificial ventilation and chest compression can be performed on older children just as for adults, but they must be done slightly faster, and with lighter pressure. The techniques require some modifications for small children and babies.

CHECKING FOR A BABY’S BREATHING

Open the airway by gently lifting the chin and tilting the head. It helps to support the head slightly. You must look, listen, and feel for breathing.
Do Not, if clearing an obstruction with a finger, you have to touch the back of a young child’s throat. If the child is suffering from an infection of the airway, this can cause swelling and, possibly, total blockage.


CHECKING FOR A BABY’S CIRCULATION

It is difficult to feel the carotid pulse in an infant so, instead, use the brachial pulse. This is located on the inside of the upper arm, midway between shoulder and elbow. Place your index and middle fingers on the inside of the arm, and then press lightly towards the bone. It may help to place your thumb on the outside of the arm. Feel for 5 seconds before deciding there is no pulse.


ARTIFICIAL VENTILATION FOR A BABY

Babies should be given artificial ventilation at twice the rate used for adults and children, using the mouth to mouth and nose technique. Make a tight seal around the baby’s mouth and nose with your mouth, and nose with your mouth, and breathe into the lungs until the chest rises. Let the chest fall. Continue giving breaths at a rate of 20 per minutes.


CHEST COMPRESSION

If you cannot detect a pulse or, in infants, if it is very slow (less than 60 beats per minute), apply chest compressions to the lower half of the breastbone. Use the adult technique for a child of school age; for babies and small children, modify the technique and rate as below. Remember that, in the absence of a pulse, chest compression must be combined with artificial ventilation.

FOR A BABY


Lay the baby on a firm surface. To locate the correct position, imagine a line joining the baby’s nipples. Place the tips of two fingers just below the mid-point of this line, and press at a rate of 100 compressions per minute, to a depth of 1.5 to 2.5cm. Combine with artificial ventilation giving five compressions to one breath.


FOR A CHILD BELOW SCHOLL AGE


Find the correct position on the chest as you would for an adult. Using one hand only, and you press at a rate of 100 compressions per minute, depressing the chest by 2.5 to 3.5cm. Combine with artificial ventilation, giving five compressions to one breath


RESTORING THE CIRCUALATION


RESTORING THE CIRCUALATION

If there is no pulse, the heart has stopped. You will have to provide an artificial circulation by performing chest compression, in which will send blood to the brain. To be of any use to the brain, this supply of blood must be oxygenated, therefore chest compression must be combined with artificial ventilation in the way laid out in The Sequence of CPR (Cardio Pulmonary Resuscitation).

CHEST COMPRESSION

1. With the casualty lying flat on his back on a firm surface, kneel beside him, and find one of his lowest ribs using your index and middle fingers. Slide your fingers upwards to the point on the middle where the rib margins join at the breastbone. Place your middle finger over this point (the xiphistemun) and your index finger on the breastbone (stemum) above.


2. Place the heel of your other hand on the breastbone, and then slide it down until it reaches your index finger. This is the point at which you will apply pressure.


3. Place the heel of your first hand on top of the other hand, and interlock the fingers.


4. Leaning well over the casualty, with your arms straight on the chest, and press down vertically on the breastbone to depress it approximately 4 to 5 cm, then release the pressure without removing your hands. 

5. Repeat the compressions, aiming for a rate of approximately 80 compressions per minute. To combine with artificial ventilation, follow the sequence.


Thursday, January 21, 2016

IF THE CHEST DOES NOT RISE


IF THE CHEST DOES NOT RISE

If you cannot get breaths into the casualty’s chest, check that:

• The head is tilted sufficiently for back.
• You have a firm seal around the casualty’s mouth.
• You have closed the nostrils completely
• The airway is not obstructed by vomit, blood or a foreign body.

CLEARING AN OBSTRUCTION


1. Providing the jaw is relaxed, sweep a finger around inside the mouth. Be very careful to avoid the back of the throat if doing this to a young child. 

2. If this fails, give backslaps and abdominal thrusts


Other forms of artificial ventilation

In situations such as rescue form water, or where mouth injuries make a good seal unpassable, you may choose to use the mouth-to-nose method of artificial ventilation. While it is usually easy to blow air into the nose, it is not so easy for the air to escape, the soft part of the noses may flop back like a valve. To give mouth-to-nose ventilation:

1. Wish the casualty’s mouth closed, form a tight seal with your lips around the casualty’s nose, and blow. 

2. Open the mouth to let the breath out. Babies should be given artificial ventilation using the mouth to mouth and nose method.
Mouth-to stoma ventilation

A laryngectomies is someone whose voice box (larynx) has been surgically removed, leaving a permanent a permanent opening (stoma in the front of the neck through which breathing takes place. Artificial ventilation must be given through the stoma. If the chest fails to rise and your air escapes from the casualty’s mouth, he or she may be a “partial neck breath”; you will have to close off the mouth and nose with your thumb and fingers while giving mouth-to-stoma ventilation.


The Recovery Position


The Recovery Position 

Any unconscious casualty should be placed in the recovery position. This position prevents the tongue form blocking the throat, and because the head is slightly lower than the rest of the body, it allows liquids to drain from the mouth, reducing the risk of the casualty inhaling stomach contents. The head, neck, and back are kept in a straight line, while the bent libs keep the body propped in a severe and comfortable position. If you must leave an unconscious casualty unattended, he or she can safely be left in the recovery position while you get help. The technique for turning shown below assumes that the casualty is lying on her back from the start. Not all the steps will be necessary if a casualty is found lying on his or her side or front. Before turning a casualty, remove his or her spectacles, if worn, and any bulky objects from pockets. 

METHOD


1. Kneeling beside the casualty, open her airway by tilting the head and lifting the chin. Straighten her lags. Place the arm nearest you out at right angles to her body elbow, and with the hand palm uppermost.
2. Bring the arm furthest from you across the chest, and hold the hand, palm outwards, against the casualty’s nearer cheek. 
3. With your other hand, group the thigh furthest from you and pull the knee up, keeping the foot flat on the ground. 
4. Keeping her hand pressed against her cheek, pull at the thigh to roll the casualty towards you and on to her side.


5. Tilt the head back to make sure the airway remains open. Adjust the hand under the cheek, if necessary, so that the head stays in this tilted position. 
6. Adjust the upper leg, if necessary, so that both the hip and the knee are bent at right-angles. 
7. Dial 999 for an ambulance. Check breathing while waiting for help to arrive.


ARTIFICIAL VENTILATION 


Expired air still contains 16 per cent oxygen, so you can use it to “breathe” for a casualty by blowing it into his or her lungs. The way this is done depends on the casualty’s condition:

• If a casualty has stopped breathing but still has a pulse, give 10 breaths of artificial ventilation, telephone for help, then continue at a rate of 10 breaths per minute until the casualty starts to breathe on his or her own, or until help arrives. Check for a pulse after every 10 breaths.

• If the casualty’s breathing and pulse have stopped, you must first phone forhelp, then combine artificial ventilation with chest compression

Using face shields

1. With the casualty lying flat on his back, please first remove any obvious obstruction, including broken or displaced dentures, from the mouth. Leave well-fitting dentures in place

2. Open the airway by tilting the head and lifting the chin

3. Close the casualty’s nose by pinching it with your index finger and thumb. Please take a full breath, and place your lips around his mouth, making a good seal.

4. Please blow into the casualty’s mouth until you see the chest rise. Take about two seconds for full inflation.

5. Remove your lips and allow the chest to full fully. Deliver subsequent breaths in the same manner.

Monday, December 14, 2015

ELECTRICAL INJURIES

ELECTRICAL INJURIES ONE

(adsbygoogle = window.adsbygoogle || []).push({}); ELECTRICAL INJURIES TWO

Tuesday, December 8, 2015

EFFECTS OF HEAT AND COLD

EFFECTS OF HEAT AND COLD


The human body is designed to work beat at, or close to, at temperature of 370C. To maintain this temperature, the body possesses mechanisms that generate and conserve heat when the environment is cold, and conversely, that lose heat when it is hot. These mechanisms are controlled by a special centre in the brain. In addition, man controls his environment to some degree through the clothing, and air conditioning. These make it easier for the body to perform well in a wide range of temperature. In spite of all this, excessive heat or cold can cause injury and, in extreme case, serious or even fatal conditions. The dangers of extreme temperatures

The danger of extreme temperatures

The harmful effects of extreme heat or cold can be localized, as in the case of suborn, frostbite, or trench foot; or generalized, or with heat exhaustion, heatstroke, and hypothermia. The generalized effects of extremes of temperature tend to be more marked in the very young and the very old, whose temperature regulation systems can respectively , be under developed or impaired. THE FIRST 

AIDER SHOULD:

• Remove normal body temperature, if the condition hot or cold surroundings

• Restore normal body temperature, if the condition was rapid in onset ( for example: heatstroke), reverse it rapidly; if it has developed slowly (for example: hypothermia of slow onset affecting an elderly people), the casualty’s body temperature must be brought gradually back to normal.

• Obtain appropriate medical attention.